
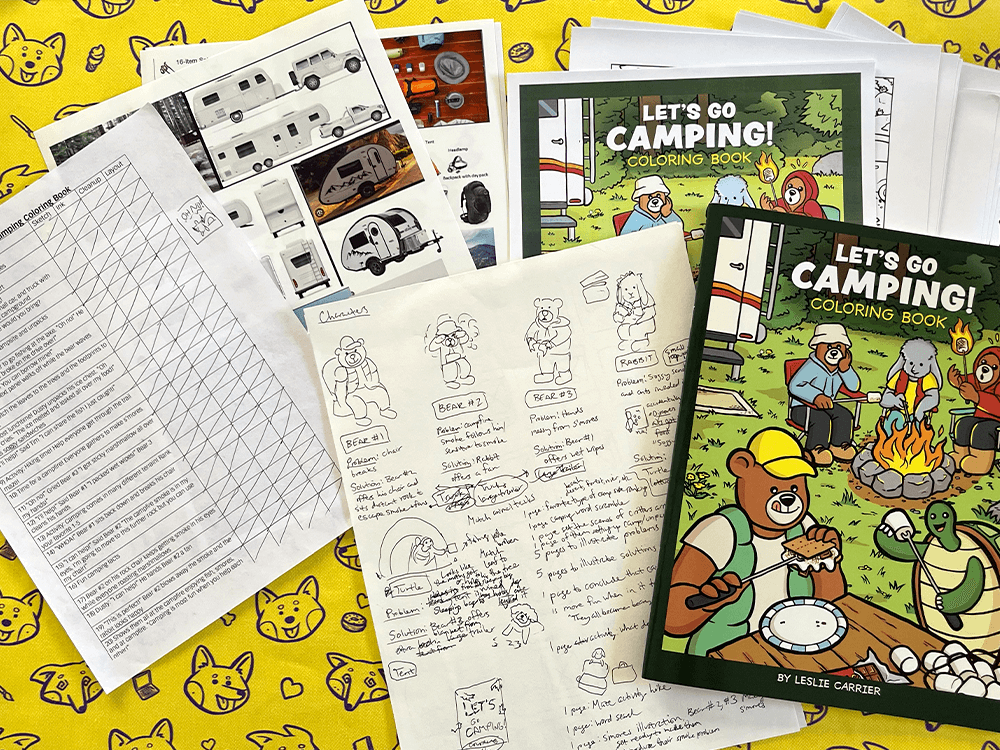
The completed coloring book along with a test printout, outline, references, and characters
I’ve dabbled in the world of creating coloring books before, but let me share my latest coloring book venture: Let’s Go Camping!. I was inspired to make a coloring book based on the woodland characters in my camping-themed sticker sheet. I enjoyed drawing those characters and wanted to develop a narrative about their camping trip, so why not make them star in their own coloring book!
Here are my steps on how to create your own coloring book. I hope this inspires you to make your own, the possibilities are endless and even more rewarding when you draw the pages yourself!
1. Come up with a theme
This will help narrow down a lot of overwhelm in creating page ideas. My theme for this book was camping and the power of helping each other.
2. Character and scene development
What are your key characters that you would like to include throughout the book? What about your scenery? Identify these main components to help you narrow down page ideas. If you’d like to make new characters per page, that’s fine too!
3. Create a page-by-page outline
Decide on your page count and make a list of the pages you’d like to draw or activities to include. This will give you a birds eye view of your book and how it will flow. Add some checkboxes to help yourself feel even more accomplished as you complete each page!
4. Build a mood board
Once you narrowed down your content and came up with the general concepts of each page, create a mood board of some related imagery. This can offer references and inspiration for your initial page sketches. I personally like to do an image search and impose thumbnail-sized images on paper for references, but many like using Pinterest boards too. Do not directly copy someone else’s art if using that as inspiration.
5. Determine your book size
Are you going to design a mini, half sheet, or full 8.5 x 11 inch coloring book? Gathering all of these specifications together will help determine what canvas proportions to draw and impose.
6. Start drawing!
You can start with thumbnail concept sketches per page and then dive in to a rough sketch of the page layout. I personally love to use Procreate, but my Halloween coloring book pages were drawn on paper. If drawing on paper, sketch lightly and then rework with more detail or trace over it on a new piece of paper. If drawing digitally, I like to use multiple layers for the sketches. I usually prefer digital format because there’s more room for error and flexibility to make composition changes.
7. Ink
Once the sketches are finalized, you can either ink by hand or digitally. I also like to use Procreate for this step: make a new layer for the ink while lightening the opacity on the sketch layer below. When I made the Halloween coloring book, I inked the pages by hand with a brush and ink after using a kneaded eraser to lighten the sketch.
8. Finalize the drawings
This can vary according to how you made your drawings. If done digitally, this just means doing any cleanup and/or importing to your page layout software. If done by hand, this includes scanning and editing.
9. Impose the book
Now you’re ready to impose the book in your favorite page editor! I personally use InDesign and setup the margins, bleed settings and page layouts, but there are so many easy online solutions out there where you can upload your drawings and then go from there. This step is also where you include any text and design for the book. If you want to go old school zine style, you can piece together the layout by hand and then photocopy.
10. Print!
Now that the book is all ready, send it to print! You can print on your home printer and build the book yourself or send to a professional printer. I like to use PrintingCenterUSA: they offer a fast turnaround time, high quality, and reasonable prices. Of course, make sure you double-check everything before printing!
I’d love to hear if you’ve made a coloring book or if you’re thinking about it!
If you’re interested in the completed Let’s Go Camping! coloring book, check out my Etsy links below: